Showing posts with label Tiles. Show all posts

March 14, 2012

Before and After: How a tiny 2,6 m2 overhanging Toilet became a pretty Kids Bathroom


A bit over a year ago, I was planning the tiny overhanging bathroom that measures 1,4 m x 1,9 m (2,66 m2). Originally it was just an "outhouse" with a toilet, a bidet and a sink. But we wanted to install a shower - in order to have an "en suite bathroom" for our son's room.

And I have to say, I am really happy with the outcome!

tiny kids bathroom 2,6 m2

I had told Angelo (our "capo" and my father-in-law) that his grandson would like to have a "green" bathroom. And, that I like "subway" tiles. I designed the tiling for the floor and the walls. Angelo over exceeded our expectations by adding a stucco ceiling (that was not there originally)!

Since the sink is right below the window - where you have a nice view in the neighbours garden and over the sea - we needed to have the mirror installed beside the window.

Our young son does not use a mirror so far... So, I do not know whether this beauty mirror is too small or not. But it looks nice! It has the right size for this bathroom.

shower area 80 x 80 cm

If you wonder why we have a rain shower installed in such a small bathroom, then because we probably made a mistake when ordering the shower equipment back in China, where we were living at some point - a couple of years before this bath renovation.

But we were lucky, it just matches the height.

  small compact toilet
For the sink, I researched online the different sizes available for different models. At the end I choose a Duravit Strack 3 model, they have a lot of options. It is important for a small area to choose the largest possible sink - as it is a hassle to wash hands in a sink that is too small.

I even asked Angelo to sit down on the toilet (that was already delivered) and measure the space between his knees and the wall to make sure, there is still enough space between toilet and sink.

The two short blue tubes that stick out of the wall next to the toilet are the pre-installation for a water spray. In Italy it is common to use bidets in private bathrooms. But with the installation of the shower we really had no more space for a bidet. So we opted for the space saving water spray - yet to come.

The floor tiles are layed diagonally in order to optically strech the room.

"spider" shower curtain holder and "fish" hooks
In a shop in Vibo Valentia, we found these green "fish" hooks. There were only two left and I bought them. Angelo fixed them behind the bathroom door. In another shop I found the "spider" that is a space saving Italian solution for hanging the shower curtain.


And here is the old bathroom, BEFORE renovation, as we found it when we bought the house:

BEFORE toilet with bidet
The toilet itself was also very tiny before and squeezed into the left corner. The bidet was eliminated for our new bathroom layout. The sink was moved below the window to give space on the right corner for a small shower.

BEFORE renovation
The only thing that was bigger in this bathroom before the renovation and became smaller after the renovation, is the window! Strangely, the window frame is so massive that the new window is much tinier. Well, these are things you encounter when renovating, whether you are on site or thousand of miles away.

"outhouse" or overhanging bathroom
Our palazzo is over 200 years old, and at that time an outhouse toilet was common in European cities. You can still sea the remains on the side of many palazzi in Italy. But of course the toilets nowadays are linked to the public canalisation.

October 11, 2011

A new old lamp

old wrought iron gas lamp

My Italian family likes to stroll antique markets and browse antique shops. Variety and prices are more attractive in Italy than in Germany. The latest find of my mother-in-law in Northern Italy is this old wrought iron chandelier that used to have a gas supply in the center of the lamp.

modified by adding new lamp shades and electrical wire

My father in law modified the gas lamp into an electric lamp by adding adding electric cables. Also the three small lamp shades of red glas are newly added. If I want, he said, I can have it for my bed room. Of course, I want! It would go along well with the red in the floor tiles.

original cement tiles with red swastika, an over 3,000 year old symbol for good luck


I am looking forward to see a picture of the chandelier hanging from the ceiling in our bed room. The pictures above were taken in my parents-in-law home in Calabria and in our house in Pizzo.

May 24, 2011

A Bathroom Vision in Blue

A dream of a bathroom! How colours can change the atmosphere! Actually it is not just painted blue walls, it is spatulato, a Venetian technique for making painted walls shine like marble.

a vision in blue

blue and pearl grey wall colour harmonizes two different pattern of Vietri tiles on wall and floor

the lighter blue of the ceiling matches one hue of the wall tiles

the wall paint reduces the strong contrast (see before here and here)

stucco borders frame the painted areas

view from above (while painting the ceiling)

beautiful perspective of a blue bathroom dream

A "specialist worker" waxing the surface of spatolato finish in order to obtain a surface similar to polished marble.

Bath room with spectacular sea view

I wish I could be there! I have not seen it in reality yet. I only have these photos for now and have to wait for summer. 

What a dream in blue!

Grazie Angelo!! You are becoming the new Michelangelo with this project! Thank you for choosing the right blue and for spending so much time on the spatulato technique.

May 19, 2011

Small Vietri tiles for small Kitchen

San Pietro 10 cm x 10 cm Vietri tiles by Francesco de Maio

This will be our small kitchen in the seminterrato. It is the one for the guests, in case they want to cook for themselves.... or when we rent out this entire floor as our guest residence.

There will be red kitchen. Something allegro. Red is a happy colour for a stone vaulted cellar. So next step is choosing tiles. We were looking at some bold Vietri tiles with red flower ornaments, there were some with quiet modern designs from the latest collection. But these tiles (20x20cm) were too big for this small area and also their red tone might not match the red tone of the kitchen, we thought.

Somehow tired after having choosen seven different pattern of tiles for the main kitchen, we were easlily caught, when our "personal" sales consultant of our frequently visited sanitary shop, presented us "San Pietro". A tiny geometrical pattern of something red and green on a 10x10 cm tile. Totally different from all these big designs we just ordered. Kind of boring, but also cute and tricky, a bit 70ies?

seminterrato kitchen walls are now tiled

The installation of these tiles were done in a couple of hours. There was only one email exchange necessary between Angelo and me to check wheather I am ok with an extra column of "San Pietro" on each side since we had enough excess tiles. - Oh, yes, and one extra trip to the sanitary shop was necessary too - to buy more of the white tiles, since I miscalculated the correct amount (for two kitchens).

Now, waiting for kitchen delivery...

May 15, 2011

Kitchen Tile Mix completed

The kitchen tile mix is now completed and walls are painted. - I am happy and relieved how the Vietri tile mix turned out.


the niche of the kitchen completely tiled

detail of the niche

entire result: Vietri tile mix completed

And I am very glad that I did the last minute change for the "u"-shape "frame" around the niche. The bue tiles (Greca blu) would have been just too bold. However, it is still a frame as its pattern does not involve much with the rest of the mix but more with itself.

After all, I have to admit, the best would have been to just continue the mix on both sides of the niche without any "framing". We only ended up like that because we started running out of tiles and needed to think how to integrate some left-over tiles from the bathroom that do not really match the mix. But at the end we made it!

How many tiles did we break? Very few, I guess. Good job, grazie Tonino, Mimmo and Angelo!

Also special thanks to Angelo for his patience and for allowing me an extra day to redesign some areas in- and outside the niche.

Yesterday, Angelo also finished the painting of the kitchen walls with our pearl grey colour.
The parquet for the flooring will be delivered next week.

The kitchen will be deliverd mid of July - just in time for our summer holiday.


---
Update:
You might be interested in what inspired and reassured me to dare a wild mix: the Thun villa in Capri, an Australian villa in Positano, the D&G villa in Portofino and a restaurant in Sicilly.

----
Remark:
Our supplier, Callipo in Vibo Valentia, has a good selection of Vietri tiles, thereof Francesco de Maio is our favorite manufacturer.


May 12, 2011

Going crazy over crazy tile mix ...

outstanding nichia (niche) - LOVE IT !

previously planned "frame" with Greca blue (from bathroom)

new "frame design" with real tiles (to be installed) after my photo of paper tiles

new idea: only 3 rows of tiles on nichia's side walls

... today I was emailing, text messaging, downloading and re-designing a lot. We are running short with our tiles. I knew from the beginning that it is just enough what I ordered. The thing is, when you have a crazy mix and run short, you have a problem. I could have ordered an 8th design, but could not find any good match. But I could not go for a second box of one of our designs since then the whole mix would not be balanced anymore. So I hoped.

Then I realized I had done a calculation error within the nichia. I had forgotten the ceiling or buttom... So very little chances we would have enough tiles!

We added a few bathroom tiles already into two walls to gain a couple of extra tiles.

I made sure the mix was balanced at all time to have a kind of harmony in the chaos. With my paper tile arrangement it looked fine until the end. But today Angelo sent me a picture of the tiles we have left for the bottom of the nichia. Surprise. It is not what I have calculated with all my paper tiles here thousand of miles away. Of course nothing balanced anymore. I will need to place bottles of olive oil and pots with kitchen tools on top of some tiles to make them disappear. Problem solved.

But more stressful was to stop the "frame" of the nichia this morning. Last night, CC saw my draft with blue Greca tiles (left-over from our bathroom) that should work as a "special" frame - and he did not like it. I knew it. I kept it as a surprise, like Angelo does sometimes. Maybe for this reason... as I am not very convinced myself.
"It looks like we run out of tiles!" he said.
"Yes. Actually, that is the purpose of patchwork: using left-over pices to help out...", I replied.

Okay, before ruining the beautiful art work, I decided to design a new frame.
We text messaged at night to Italy, to make sure Angelo opens his emails in the morning and stops Tonino in time.

This worked out fine. Before Angelo woke up, I had emailed him already the new frame this morning from Bangkok. I also redesigned the sides and ceiling.

I took many pictures of my paper tile arrangements. I added notes to avoid misunderstandings. I looked at it again and again and at the end, I came back to an idea from the night before:

Why tiling all the side walls and ceiling of the nichia? It looks so stunning on Angelo's photo. It stands out. Will it not be overloaded with more tiles? If we do only 3 rows inside the nichia, corresponding to the outer walls, we would also have solved our tile problem !!!

What do you think? You only have a couple of hours to reply until buys workers in Italy go back to work!

May 10, 2011

Oh my God ! My crazy Tile Mix turns out Sensational !

I LOVE IT !!! Grazie Angelo, Tonino & Mimmo, baci a tutti (even if you don't like it) ! I am so happy to see the fantastic result !


Since the tiles have arrived yesterday, I knew, there is a chance that Angelo sends me first impressions of the crazy mix during lunch break in Italy. I was so excited and could not wait to see it. I am relieved how beautiful, how bright and colourful "my mix" looks like. I worked hours on it with tiny paper tiles deep at night... Grazie mille for following "my design"! (was someone swearing about the work?)

I am looking forward to see more pictures soon.
Meanwhile, I will show the photos that were used as model today:

wall no 1 - and "frame" for niche (coming)

wall no 2

wall no 3

wall no 4 - the wall inside the niche

For the entire mix I ordered seven different types of Vietri tiles. - The sales woman at Callipo who knows us well since the start of the renovation was not very convinced. - Each pattern came in a box of 25 tiles, equals 1m2. As I did a calculation mistake I had to include 8 left over tiles from a pattern we used in the masterbath. And additionally I created a kind of frame around the niche (which will show later) out of another 6 left over tiles from the bath.

In total, the workers had nine (!) different boxes to select the correct tiles from, one by one according my master plan. I am very happy they did not refused to do so ! ;-)

And if Franceso de Maio wants to copy that mix for their new catalogue they can name it "Palazzo Pizzo" since I have a copyright now!

Colour Testing for the Masterbath and first Results

You might remember my wild mesmerising Vietri tile combination in our master bathroom (and here). There were doubts if it should remain like that with white walls. Or whether we paint the walls in a deeper blue at the same hight as tiles end behind the sink and toilet. - Let's try it out we said:

greenish paint from the 1st colour testing in the  living room

Although, we had a deeper blue in mind, I saw during the colour testing in the living room, that the greenish paint would perfectly match the wall tiles in the masterbathroom. If we would not use it in the living room, we could use it up here.

view from further away

But the floor tiles are totally different and the contrast to the wall would be even bigger than it is already now. That's why we had already bought a blue colour sample to try out in the bath. It is the same metallic antique type paint we are using in the living room.

metallic "antique" blue paint

Nice try. But the metallic effect is too strong in this bright room and the blue does not really match the floor either. Angelo had to cover the trial again with white paint and find a new solution. We did not dare to ask him to do a "spatulato" wall. This is a traditional Venetian finish. Originally made with chalk powder, oil, natural glue from animals and natural pigments. Nowadays, acrylic or vinyl resin is used, but it still requires a lot of work. But Angelo proposed it himself!

spatulato finish 

This is the only photo Angelo has send from the wall. I guess, at that time the other walls were not finish or the room was still too messy to shoot a photo from the entire room. 

bathroom ceiling

But we have ceiling photos. It is a light blue, but not as light as used before in the piano terra for the ceilings of the entrance #37, the kitchen and the window's niches. I asked him to match the blue a bit with the blue of the wall tiles. I think he used the same hue as used on the ceuiling in the corridor in front of the green bathroom. And this is perfect!

bathroom walls and ceiling

A white stucco border was added on top of the mid-hight tiled wall and runs now around all walls. The colour of the ceiling is taken down on the wall to form an app. 20 cm wide border. This reduces the felt hight and is supposed to make the room cosier. This blue border is also limited by a stucco border, that is however a bit wider than the first stucco border. Inbetween the walls Angelo used the same "pearl" white or grey paint as in the living room. The grey colour is supposed to look warmer than a plain white.

I am myself curious how the wall looks behind the bath tub and on the opposite site! Angelo, please send more photos!

May 06, 2011

Cement Tiles

In my last post I have shown our "recycled" cement tiles that were used in a former room and now in our entrance. We also have beautiful cement tile floors upstairs, all originally from the previous owners.

If you too are interested in giving your home a mediterranean touch with tiles you could do that either with Italian Vietri tiles or with cement tiles by Masaic del Sur, a spanisch manufacturer from Sevilla which I found via AD (French Edition, April 2011):

Mosaic del Sur offers cement tiles in 800 designs and 72 colours.

traditional pattern for kitchens

floral pattern (available in 72 different colours) for bathrooms

April 30, 2011

Milestones

Today, Angelo sent those pictures you can say they show milestones in our renovation work:

The flooring of the entrance is done !

I am glad, we found enough original tiles and could avoid a mix with another pattern. However, it was just the right amount of tiles to lay a kind of floral carpet. For the "gap" we added travertine that now looks like a border made on purpose. - When you now enter the main door and go straigth upstairs, you do not pass any dusty renovation area anymore!

The ceiling of the large living space is done!

This ceiling was hell of a work over several weeks that Angelo managed all alone. I only grated off a  few cm2 of old layers of paint with a small special knife to uncover the former fresci. Not much was left to lay bare, but it gives this space the appropriate old palazzo atmosphere. More about the ceiling and its construction in another post.

More milestones: Please have a look at my ABOUT page that I have newly added to the blog. Also I am happy to see that my blog hits this month an all time high visitor record. Thank you!

April 19, 2011

Mixing Vietri Ceramic Tiles

mixing and playing with tiles

The main kitchen is ordered and will be ready in about two months - just in time for our summer holidays. Now, the next step is to decide on tiles for the kitchen walls. The kitchen is modern and open to the living area. But since our over 200 year old house is located in the South of Italy in the historic center of a pittoresque fisher village, we should add some mediterranean atmosphere to the modern kitchen moduls.

Something unique that you would never find in another place, something that you would look forward to see in your seaside home. Colourful tiles from Vietri (near Salerno) or from Sicily - yes! But how could we decide on one design or one colour? They are all so beautiful!

This is when I remembered the beautiful effect of mixing antique ceramic tiles.
Here my favorties samples:

wild mix of antique tiles in the kitchen of Stefano Gabbana and Domenico Dolce (D&G) in Portofino

mix of antique Vietri tiles by Antica Ceramica in the kitchen of Villa Thun in Capri

more antique ceramic tiles outside Villa Thun, Capri via Elle Decor

modern mix of antique Vietri tiles in a 18th century villa in Positano realised by Lazzarini Pickering Architetti

kitchen and dining area of same Positano Villa
(geometric effects and patterns stand ahead of colour effect)

fresh mix of colour and pattern on restaurant wall at Verdura golf resort in Sicily

After this presentation I had my husband convinced that we should look for a good mix of tiles instead of one single design only. And this is what I did then on Sunday: google, print, cut and puzzle ...


cut and paste with paper tiles

I had "analysed" the different mixtures above and found that they all use 20 x 20 cm tiles and that although many different patterns were chosen, half or more of them where independent designs, only few tiles where just part of a pattern of four tiles. This is quiet interesting, since although sometimes more than eight different tiles were used for a wall the overall effect was still harmonious.

Our supplier, Callipo in Vibo Valentia, has a good selection of Vietri tiles, thereof Francesco de Maio is our favorite manufacturer.

Since I am not familiar with Angelo's computer, I did "cut and paste" in a very traditional way. I printed the pages from the downloaded de Maio catalogue and cut with sisors the tiles we liked. This even worked out better, as I can now easily move little puzzle pieces and check out the best effect. As we need 7 m2 for the kitchen, and the minimum order is 1 m2 per design, we might order these seven different designs we had chosen above.

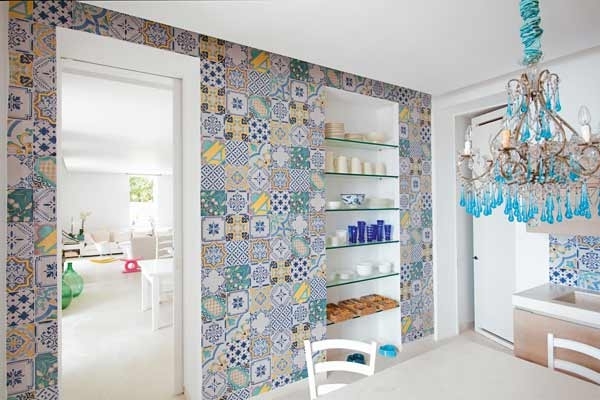
And, if one is undecided between wallpaper and tiles, I just found this solution - it looks like a tiled wall but it's not:

wallpaper design by wall and deco via Spazio Casa

This is not a solution for wet areas in bathrooms or kitchens - and regarding the price (98 Euro/m2), you better go for real Vietri tiles, maybe not the antique ones, but antique pattern newly manufactured are available for less, depending on the design and colour.